Thursday, December 30, 2010

Scalloped Potatoes

Posted by Alison

So the question after every Christmas is what to do with all that leftover ham? Make Scalloped Potatoes of course! This is a recipe based on one from Taste.com.au, but of course I think mine's better!

What do I need?
  • 20g butter
  • 1 onion, halved, thinly sliced
  • 1kg Desiree potatoes
  • 300ml milk
  • Sliced ham
How is it done?
  1. Preheat oven to 200°C. Lightly grease a 6cm deep, 15cm x 24cm (base) ovenproof dish.
  2. Melt butter in a frying pan over medium heat. Add onion. Cook for 4 minutes or until soft. Remove from heat. Set aside. Slice potatoes into 5mm-thick rounds. Pour cream into a jug. Add nutmeg, and salt and pepper. Whisk with a fork to combine.
  3. Arrange a layer of potatoes over base of prepared dish. Top with a layer of onion. Drizzle with a little cream mixture. Repeat layers until all ingredients have been used.
  4. Cover dish tightly with foil. Bake for 30 to 40 minutes or until potatoes are just tender. Remove foil. Cook for a further 30 minutes or until top is golden.

Tips and Tricks: Leave out the ham for a meatless option; sprinkle with cheese before baking for a cheesy option, yum!

Friday, December 24, 2010

An Australian Christmas Lunch

Christmas 2010


We're off the non-cooking, cold served Christmas Lunch family and this year was no different.

Starters:


  • A variety of pickled goods including peppers, gherkins, pickles and artichoke hearts (see above)
  • Spinach dip (see center item)
  • Brie with crackers
Main:


  • Oysters
  • Sliced ham off the bone
  • Crayfish
  • Balmain Bugs
  • Prawns
  • Smoked Salmon
  • Coleslaw
  • Potato salad
  • Garden salad
Dessert:

My birthday is close to Christmas so I requested the layered pavlova.


We also had:
Hope you all had a great Christmas, no mater what you ate or where you were!

Saturday, December 18, 2010

Handmade Gifts: Quick and Easy Fudge

Posted by Rebecca

Yes, another Martha Stewart recipe, she calls it Foolproof Holiday Fudge and it was indeed foolproof.

Here's my version.

What do I need?


  • 2 cups sugar


  • 1 teaspoon salt


  • 6 tablespoons unsalted butter


  • 1 cup double cream


  • 3 1/2 cups marshmallows


  • 3 cups nestle milk chocolate chips


  • 1 teaspoon pure vanilla extract


  • How do I do it?


  • Line a  baking pan with two sheets of waxed or parchment paper in a crisscross manner (one lengthwise, one crosswise) so ends overhang sides of pan.


  • In a heavy-bottomed saucepan over medium heat, cook sugar, salt, butter, cream, and marshmallows, stirring, until butter and marshmallows are almost melted, 5 to 6 minutes.


  • Bring mixture to a boil; cook, stirring occasionally, 5 minutes. Remove from heat. Add chips and vanilla; stir until chips are melted. Pour mixture into lined pan.


  • Let fudge cool in the pan at room temperature, 3 hours. Use edges of paper to lift out fudge; place on cutting board, and remove paper. Cut out shapes with cookie cutters, or cut fudge into bars.


  • Tips and Tricks: Fudge can be stored in an airtight container at room temperature up to 1 week. Try sprinkling with crushed candy canes. Substitute the milk chocolate for white chocolate.

    So mine didn't end up so pretty, but it tastes delicious!


    Saturday, December 11, 2010

    Handmade Gifts: Marshmallows

    Posted by Rebecca

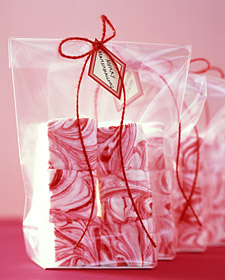
    I'm a big fan of Martha Stewart's website and found these cute Christmas Marshmallows which would make great gifts.

    What do I need?
    • Vegetable-oil cooking spray
    • 2 cups sugar
    • 1 tablespoon light corn syrup
    • 4 packages (1/4 ounce each) unflavored gelatin
    • 3/4 teaspoon peppermint extract
    • 2 large egg whites
    • 2 teaspoons red food coloring
    How do I do it?
    1.     Coat an 8-inch square pan with cooking spray; line bottom with parchment paper. Coat the parchment with cooking spray, and set pan aside. Put sugar, corn syrup, and 3/4 cup water in a small saucepan. Cook over medium heat, stirring, until sugar is dissolved. Stop stirring; let mixture come to a boil. Raise heat to medium-high; cook until mixture registers 260 degrees on a candy thermometer.
    2.     Meanwhile, sprinkle gelatin over 3/4 cup water in a heatproof bowl; let stand 5 minutes to soften. Set the bowl with the gelatin mixture over a pan of simmering water; whisk constantly until gelatin is dissolved. Remove from heat, and stir in extract; set aside.
    3.     Beat egg whites in the bowl of an electric mixer fitted with the whisk attachment until stiff (but not dry) peaks form. Whisk gelatin mixture into sugar mixture; with mixer running, gradually add to egg whites. Mix on high speed until very thick, 12 to 15 minutes.
    4.     Pour mixture into lined pan. Working quickly, drop dots of red food coloring across surface of marshmallow. Using a toothpick, swirl food coloring into marshmallow to create a marbleized effect. Let marshmallow stand, uncovered, at room temperature until firm, at least 3 hours or overnight. Cut into squares


    Thursday, December 2, 2010

    Gingerbread Men

    Posted by Alsion

    Just in time for Christmas, the Gingerbread men recipe from http://www.taste.com.au/

    What do I need?


  • Melted butter, to grease

  • 125g butter, at room temperature

  • 100g (1/2 cup, firmly packed) brown sugar

  • 125ml (1/2 cup) golden syrup 

  • 1 egg, separated

  • 375g (2 1/2 cups) plain flour

  • 1 tbs ground ginger

  • 1 tsp mixed spice

  • 1 tsp bicarbonate of soda

  • Plain flour, to dust

  • 150g (1 cup) pure icing sugar, sifted

  • 8-10 drops red liquid food colouring

  • 8-10 drops green liquid food colouring

  • Smarties or M&Ms, to decorate


  • How is it done?
    1. Preheat oven to 180°C. Brush 2 baking trays with melted butter to lightly grease.
    2. Use an electric beater to beat the butter and sugar in a bowl until pale and creamy. Add the golden syrup and egg yolk and beat until combined. Stir in the flour, ginger, mixed spice and bicarbonate of soda. Turn onto a lightly floured surface and knead until smooth. Press dough into a disc. Cover with plastic wrap and place in the fridge for 30 minutes to rest.
    3. Meanwhile, place egg white in a clean, dry bowl. Use an electric beater to beat until soft peaks form. Gradually add icing sugar and beat until stiff peaks form. Divide icing among 3 bowls. Cover 1 bowl with plastic wrap and place in the fridge. Add red colouring to 1 bowl and stir until combined. Add green colouring to remaining bowl and stir until combined. Cover with plastic wrap and place in the fridge.
    4. Place the dough between 2 sheets of baking paper and roll out until about 4mm thick. Use a 9cm gingerbread man cutter to cut out shapes. Place on trays about 3cm apart. Repeat with any excess dough.
    5. Bake in oven for 10 minutes or until brown. Remove from oven. Transfer to a rack to cool.
    6. Place prepared icings in small plastic bags. Cut a small hole in a corner of each bag. Pipe icing over gingerbread men to decorate.

    Friday, November 26, 2010

    Bruschetta

    Posted by Rebecca

    I have never really been a fan of Bruschetta until recently, perhaps I’d never experienced a well made Bruschetta.  I definitely wouldn’t have considered making it; it just looked too complex and time consuming. However I did recently give it a go, using a recipe my mother makes and adding my own splash of something (you’ll see).
    Serves 4

    What do I need?
    ·         Three tomatoes
    ·         2 cloves of garlic
    ·         1 sourdough loaf
    ·         A handful of fresh basil
    ·         2 tbsp balsamic vinegar
    ·         Salt and pepper to taste

    How is it done?
    ·         You can pre-prepare the tomato mixture beforehand and leave in the refrigerator
    ·         Dice the tomatoes
    ·         Chop the basil and mix into tomatoes
    ·         Add the balsamic vinegar and mix thoroughly
    ·         Add salt and pepper to taste, I usually sprinkle crushed rock salt and skip the pepper
    ·         Slice the sour dough thickly
    ·         Grill in the oven until golden brown on one side only
    ·         Rub the garlic over the warm bread
    ·         Spoon the tomato mix onto the bread pieces
    ·         Serve immediately


    Tips and tricks:
    ·         Try using olive or tomato pesto spread thinly on the bread before adding the tomato mix for a richer flavour
    ·         Substitute the balsamic vinegar with equal amounts of sweet chilli sauce for a little bit of zing
    ·         Instead of using sourdough, try it with grilled pita bread or on a pizza base

    Friday, November 19, 2010

    Kofta: Middle Eastern Meatballs

    Posted by Alison

    Basic Kofta Mixture
    What do I need?
    • 1kg finely ground lamb (or beef but lamb is better)
    • 1 cup finely chopped parsley
    • 1 teaspoon mixed spices
    • 1 cup finely chopped or ground onions
    • 3 teaspoons salt
    • 1/2 teaspoon black pepper
    What do I do?

    Mix all the ingredients together in a large bowl and knead well. Place the mixture through the fine blade of a grinder twice or alternatively knead well for a further 20 minutes occasionally adding small quantities of iced water.  
    Then add
    1 egg white
    1kg Basic Kafta Mixture flour
    Olive or Nut oil
    Mix the unbeaten egg white into the kafta mixture. Mould the mixture into little patties. Dip the patties in flour and pan fry in hot oil.
    Tips and Tricks: Serve with potato chips and salad or sauteed vegetables. Hoummus b'Tahini (otherwise known as Homus) can be used as a sauce.

    Friday, November 12, 2010

    Sushi


    Post by Rebecca


    One of my favourite foods is Sushi, I have a particular fondness for the salmon variety (fresh that is) and have been very fortunate to have been eating regularly at the Japa Deli in Auckland (http://japadeli.co.nz/) and the Sushiko in Port Macquarie, NSW due to work commitments.


    My favourite evening meal at a Japanese place would involve the Salmon Nigiri (see above), Salmon sashimi (see below) and either the vegetable tempura or the pork pancake.


    I think my fondness for these dishes are that they’re simple but tasty and always make me feel good after I’ve eaten them. My disappointment is that when I’m not travelling then the closest sushi place is a good 20 minutes away and focuses more on the sushi roll variety (I love the salmon and avocado or the cucumber and avocado variety)  than the nigiri or sashimi.


    Friday, November 5, 2010

    Home Made Apple Pie

    Post by Alison

    I love to bake and I caught onto this recipe for apple pies due to the pastry being the best and the recipe being a lot easier to use. So lets have a go...

    Serves 8

    What do I need?

    For the apple filling:
    • 1kg (about 5 large) Granny Smith apples
    • 74g (1/3 cup) sugar
    • 1 teaspoon (5ml) water
    For the pastry:
    • 150g cold butter, roughly chopped
    • 56g (1/4 cup) caster sugar
    • 165g (1 cup plus 1 tablespoon) plain flour
    • 85g (1/2 cup plus 1 tablespoon) self-raising flour
    • 1 large egg, lightly beaten

    How is it done?
    1. Peel  the apples, then chop apples into quarters and remove the cores. Then chop apple into bite-sized chunks.
    2. Place chopped apple, 74g sugar and water in a large saucepan. Cover saucepan and place over high heat. When the water in the mixture reaches a boil, reduce the heat to a simmer. Stir mixture every five minutes or so during the cooking time. The apple should take about 15 minutes to cook. Remove saucepan from heat when the apple has lost its crunch and is just tender when pierced with a knife.
    3. Set the filling aside to cool to room temperature.
    4. Place butter, 56g caster sugar and flours in a food processor. Process ingredients on medium speed until the mixture resembles fine fresh breadcrumbs (about 25 seconds).
    5. Add the egg and process until the egg is incorporated and the mixture clumps together (about 20 seconds).
    6. Remove pastry from processor and divide it into two pieces, making one slightly larger than the other. Shape each piece of pastry into a disc.
    7. Preheat oven to 200 degrees Celsius (180 degrees Celsius fan-forced). Place oven shelf in the lowest shelf position in the oven (this is not necessary if you are using a fan-forced oven).
    8. Place the larger piece of pastry between two sheets of baking paper and roll pastry out to form a 25cm diameter circle (pastry should be about 5mm thick). Remove the top sheet of baking paper. Lift the pastry, still on the baking paper, and invert it into the pie dish. Peel the baking paper away from the pastry and ease the pastry into the dish. Gently press the pastry into the dish, trying not to stretch the pastry. We do not extend the pastry onto the lip of the pie dish as we found that this part of the crust tended to break off when the pie was cut.
    9. Roll out remaining pastry between two sheets of baking paper to form a 24cm diameter circle.
    10. Spoon apple filling into the pastry case and smooth the surface of the filling with the back of a spoon.
    11. Cover filling with pastry lid and press edges of pastry base and lid together. Using a sharp knife, trim edges of pastry and cut a 3cm slit in the centre of the lid.
    12. Bake pie for 20 minutes at 200 degrees Celsius (180 degrees Celsius fan-forced), then reduce heat to 180 degrees Celsius (160 degrees Celsius fan-forced) and cook for a further 18 to 22 minutes, or until pastry is golden.
    13. Remove pie from oven and set aside for 15 minutes to allow the pie to cool slightly, making it easier to slice and serve neatly.


    Tips and Tricks: Add a cinnamon stick and vanilla pod to the apple filling for that little bit extra flavour. Serve warm or cold with ice cream, custard and/or whipped cream.


    Friday, October 29, 2010

    Fruit Smoothie - Breakfast on the go

    I’m not much of a morning person. In fact that’s a major understatement, so I often struggle to have a hearty breakfast before rushing out the door in the morning. With the warmer months however I love making a banana (or other fruit) smoothie to start my day.

    What do I need?
    • 1 medium banana
    • 1 cup ice
    • 1 cup of milk (I use skim or low fat)
    • 1 tbsp sweetener or honey (optional)
    • Blender or food processor

    How is it done?
    • Combine all the ingredients at once
    • Blend until smooth
    • Serve
    It’s that simple!

    Tips and tricks: For added variety use half a banana and ½ cup of berries, or if you’re not a banana fan replace the banana totally using 1/3 cup strawberries and 1/2 cup blueberries.

    Friday, October 22, 2010

    Who are Two sisters with a spoon?

    Two sisters with a spoon are two sisters in their thirties from Australia with a passion for food - eating, baking, experimenting and viewing that is!

    Sister 1: Rebecca


    What is your attraction to food? The colour and the taste, I think this is one of the reasons I have always enjoyed vegetables, because of the colour in them.

    What is your favourite dish/ingredient? This is a hard one, I love salmon, vegetables, seafood in general and a good steak

    Where do you get your inspiration for? From my travels (check out my travel blog: http://aroundtheworldwithrebecca.blogspot.com/), magazines and my sisters tasty baked goods, she definitely got the talent for baking out of the two of us!

    What can you expect from your posts? Simple easy to make dishes - I don't have a lot of time to cook so when I do I want it to be fresh and quick. I'll also be reviewing blogs, recipes and restaurants.

    Tell us something about yourself? I love to travel and eat, in between I love searching for a vintage find, reading, going to a rugby match and watching motor sports.


    Sister Two: Alison

    What is your attraction to food? To be able to cook and create different flavours. I enjoy fresh flavours you get from cooking at home compared to brought goods.

    What is your favourite dish/ingredient? I love to cook roasts, but really it's everything from roasts to meals where you just add the sauce.

    Where do you get your inspiration for? It's all about fresh, home cooked meals.

    What can you expect from your posts? Different recipes and where I find them.

    Tell us something about yourself? I love to cook and travel

    Friday, October 15, 2010

    Coming soon...


    The food we love - to eat, cook, or see!

    Sisters from Sydney, Australia share their recipes, their reviews and so much more.

    Keep watch for our first post coming soon.